Pattern number One
Smoothie/Barbie Hat
This pattern is for Smoothie hats but also good for Barbie! If you don't know what the smoothie hats are for head on over to The Big Knit to find out more.
This time i had remembered to write the pattern down so i could share it with those interested. These hats are simple to whip up in no time and are great for using up odds and ends of wool.
I have added it as a written pattern but if anyone wants photos to help just comment below and I'll get that done but only thought to do that half way through a hat!!
OK here goes I have written it in US terms as that's how i learnt but i will also add the UK
I use a 4mm hook for this and any yarn works pretty well
Key: US
ch - chain
sc- single crochet
hdc - half double crochet
st - stitch
sl t - slip stitch
hdc2tog - half double crochet 2 together
sc2tog - single crochet 2 together
Ch 25.
hdc into 2nd ch from hook
one hdc in each chain across (24 st)
* ch1. turn. 1 hdc into each st* (24 st)
repeat from * to * for 3 more rows (24 st)
ch 1 and turn
hdc into first 2 st, hdc2tog, hdc, hdc, hdc2tog, hdc, hdc, hdc2tog, hdc, hdc, hdc2tog, hdc,hdc,hdc2tog, hdc, hdc2tog, hdc (18 st ) don't worry if it starts curling that is perfectly normal
ch 1 and turn
*sc, sc, sc2tog * repeat *'s 3 times and then sc in last 2 st (14 st)
ch 1 turn
1 sc in each stitch across (14 st)
fasten off with a sl st. leave about 6 inches of yarn to sew together.
Sewing together
Weave the yarn in and out of the top stitches and pull tight to create the top of the hat. now sew the two sides together to form the back of the hat. weave in ends and your done.
I hope this made sense to you all as I'm so used to writing patterns for myself that i get lazy and just write the whole thing in abbreviations!!
Right now for the same pattern in UK
Key: UK
ch - chain
dc- double crochet
htr - half treble crochet
st - stitch
sl t - slip stitch
htr2tog - half treble crochet 2 together
dc2tog - double crochet 2 together
Ch 25.
htr into 2nd ch from hook
one htr in each chain across (24 st)
* ch1. turn. 1tr into each st* (24 st)
repeat from * to * for 3 more rows (24 st)
ch 1 and turn
htr into first 2 st, htr2tog, hdc, hdc, htr2tog, hdc, hdc, htr2tog, hdc, hdc, htr2tog, hdc,hdc,htr2tog, hdc, htr2tog, hdc (18 st ) don't worry if it starts curling that is perfectly normal
ch 1 and turn
*dc, dc, dc2tog * repeat *'s 3 times and then dc in last 2 st (14 st)
ch 1 turn
1 dc in each stitch across (14 st)
fasten off with a sl st. leave about 6 inches of yarn to sew together.
Sewing together
Weave the yarn in and out of the top stitches and pull tight to create the top of the hat. now sew the two sides together to form the back of the hat. weave in ends and your done.
Here is what your finished hat should look like

The little hats with the band round the bottom were done using this pattern but after the first row i finished of the added the second colour which i continued the pattern with. To create the stripy hat start an new colour on each row apart from the last where you do the same colour as the row before.
For those who have never done a decrease before i have added a couple of links to tutorials on how to do the sc/dc decrease and the hdc/htr decrease that i found useful when i was learning.
here is the one for the sc/dc decrease - https://www.youtube.com/watch?v=8zxV1em2670
and for the hdc/htr decrease - https://www.youtube.com/watch?v=4VB7orGBABk
As always i am happy for people to use my patterns but please do not duplicate,lend, claim, or sell them as your own. I am happy for you to post your finished items online but please link back to my blog for the pattern. You can sell as many finished items as you wish that have been made using my pattern but please bear in mind that it was created for use to raise money for charity.
Thank you
x
Pattern Number Two
Ice Pop Cosy
It can be used to hold your ice pop,
freezy, frube or anything like that. It is available in 3 different sizes to
suit not only the size of the ice pop but also the size of hand that is holding
it.
The pattern is available to download for free from my Ravelry
store here so
you can save it for later. It is also written in both UK
I am also going to add the US UK
Here you go

A perfect item to keep both big and small
hands from getting too cold while cooling down this summer. Great for
beginners. The pattern is written in 3 sizes depending on the size of hand
you’re making them for.
Pattern is written in US terms
Materials needed:
Any DK or worsted weight yarn (only need a small amount and scraps
work great for stripes
5mm hook (US
Yarn needle (for sewing in ends)
Sizes:
6 rows = small (perfect for toddler or child)
8 rows = medium (teen and women)
10 rows = large (big man hands)
Abbreviations:
Dc - Double Crochet
sl st – Slip Stitch
Ch – Chain
Now to start:
Ch 14
1. Dc 3rd chain from hook. Dc each chain across.
2. Ch 2 turn. Dc between the 1st 2 dc of row before. Dc between each
set of dc on row before until you reach the end.
If you are using one colour repeat row 2 for required number of
rows. Skip to Sewing together
If you are working stripes then please continue to step 3
3. Fasten off colour on row 2, turn and
attach the new colour to the space between the dc of row before. Ch 2 dc into
same space. Continue adding 1dc to each space along. Ch 2 turn. Repeat with dc
in each space. Fasten off
4. Repeat row 3 once, twice or 3 times more
depending on the length you are making.
Fasten off last row but leave a long tail to sew up the side.
Sewing together:
Fold in half width ways with right sides together. Whip stitch
down the side making sure to catch only part of the dc post and not go between
the posts (as this leaves a big gap). When you reach the bottom you now have
the choice to fasten off and weave in ends or to sew across the bottom (this is
handy to do if you have the short ice pops as they sit snug in the bottom. We
usually have the large ones so we like to be able to move the cosy up the ice
pop as we eat them.
Pop in your ice pop and enjoy!
You are more than welcome to sell your finished items but please
no not sell the pattern or claim it as your own. If you choose to sell or share
your finished product please give credit to Jenny @ CraftyNookReviewer.blogspot.com/
Pattern Number Three
Soap Saver
This pattern is available for FREE over on Ravelry in my store. It's all ready to download straight to your computer and it is available in both UK and US terminology. Please feel free to share the pattern but do not claim it as your own as it took a lot of time and effort to get it right. I had a lovely group of ladies test the pattern for me and they were all happy with their finished projects so i hope you will be to.
The soap saver pattern can be found HERE
This is what your item should look like when finished ( these are some made by my tester ladies)


XxX
Newborn Slippers
The slippers are from a pattern i found when i first started to crochet but can't find the original blog anymore. (if anyone does please let me know so i can give credit). As i couldn't find the pattern but knew the basic principal of it i went to my daughters baby Annabell doll for size!! I will add the pattern i used at the end as had to work with the hook size i had available that wasn't attached to a WIP and a dolls foot for size guide. It came out alright though as you will see below.


 Your finished slipper. These were 2 random slippers i made when trying to work out size but they are more preemies size as they won't even go over Annabells toes!!
I found the pattern really simple to follow and it worked up nice and quick. The cross stitch is what took me the longest which was my own fault as i chose 2 colours for the rose that were all very similar and unless i was working in bright daylight i couldn't tell one from the other. Once i had decent light and had got the hang of the cross stitch without getting in tangles it worked up nicely - much easier to weave ends in as you go otherwise you end up tangled and frogging (undoing!!) several times.
This was my finished item. I think next time i will make the hat in a lighter colour so i have more choice with the colours for the rose. The photos aren't the best as my daughters baby Annabell doll wasn't playing ball and kept trying to slide down in the chair!!

Annabell was being a good model today and decided to sit still
This is the hat with large flower and matching button (see below for pattern link)
The Slippers have matching flowers and buttons
The slipper pattern
I have written the pattern in both UK and Us terms
newborn size.
DK yarn and 4.5mm hook
US terms
Ch 16,
Hdc into 3rd ch from hook and in each chain across,
*ch 2 and turn
Hdc in same stitch as ch2, Hdc in each st across*
Repeat from* to * for 10 more rows (12 rows in total)
Fasten off and leave a long tail to sew ( about 6-8")
UK terms
Ch 16,
Htr into 3rd ch from hook and in each chain across,
*ch 2 and turn
Htr in same stitch as ch2, Htr in each st across*
Repeat from* to * for 10 more rows (12 rows in total)
Fasten off and leave a long tail to sew ( about 6-8")
Now to sew it up
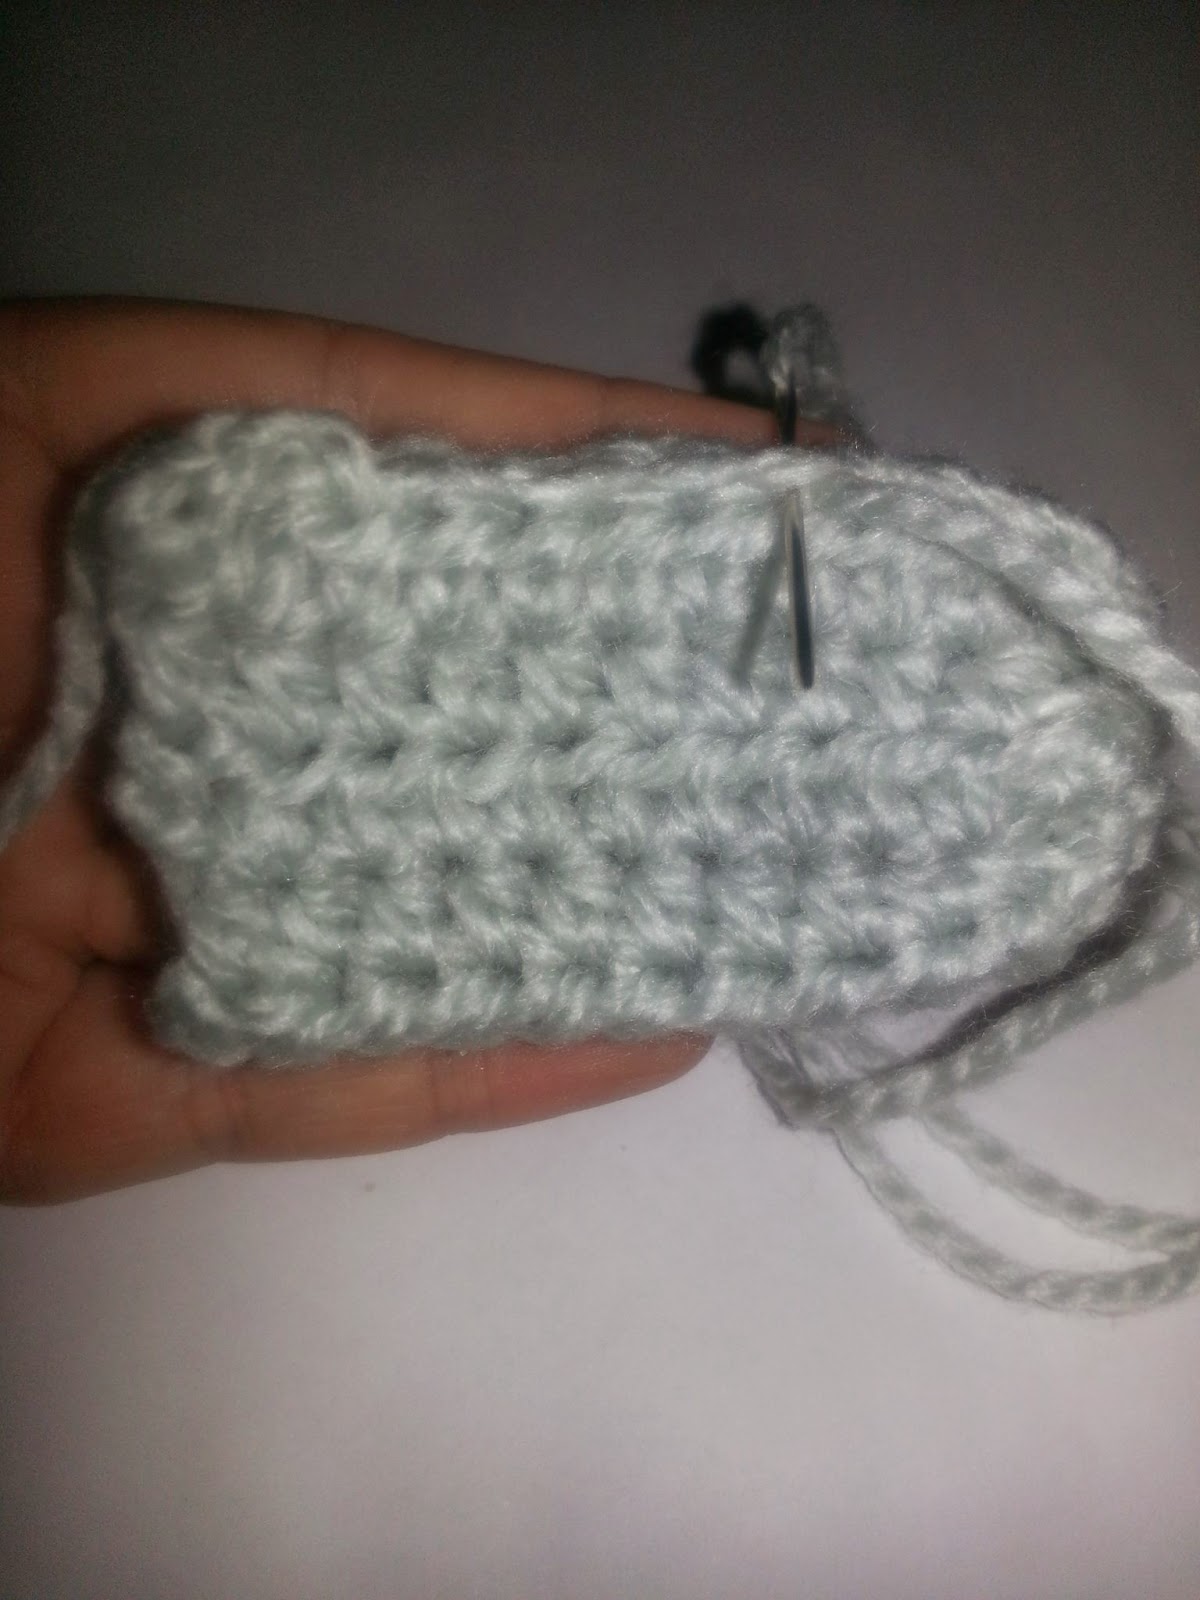
 Start by weaving the long end in and out down the side of your rectangle all the way to the bottom
 Before pulling tight insert the needle into the top of your work where you began weaving. pull through and then pull tight
 It should now look like this and you have a toe to the shoe
 Next fold the slipper flat and whip stitch the 2 sides together
 Stop between 1/3 and half way across the top so you leave an opening for the foot to go in.
 option 2 instructions. Whip stitch back across the top of the slipper to the toe. Weave the yarn through the toe to give extra support and then feed the needle through the stitches at the bottom of the slipper like in the photo. Whip stitch up the back of the slipper. Fasten off and weave in all ends
Start by weaving the long end in and out down the side of your rectangle all the way to the bottom Before pulling tight insert the needle into the top of your work where you began weaving. pull through and then pull tight It should now look like this and you have a toe to the shoeNext fold the slipper flat and whip stitch the 2 sides together Stop between 1/3 and half way across the top so you leave an opening for the foot to go in.
Now you have 2 choices: 1, fasten off and re attach at the opposite side to the toe so you can sew the back up or 2 you can follow the instructions below
option 2 instructions. Whip stitch back across the top of the slipper to the toe. Weave the yarn through the toe to give extra support and then feed the needle through the stitches at the bottom of the slipper like in the photo. Whip stitch up the back of the slipper. Fasten off and weave in all ends Your finished slipper. These were 2 random slippers i made when trying to work out size but they are more preemies size as they won't even go over Annabells toes!!
If you find any problems with the pattern please shout and i'll see where i've gone wrong
Please do not sell this pattern as your own
For those interested in the Hat pattern designed by NIcole it can be purchased on her Etsy page.
I found the pattern really simple to follow and it worked up nice and quick. The cross stitch is what took me the longest which was my own fault as i chose 2 colours for the rose that were all very similar and unless i was working in bright daylight i couldn't tell one from the other. Once i had decent light and had got the hang of the cross stitch without getting in tangles it worked up nicely - much easier to weave ends in as you go otherwise you end up tangled and frogging (undoing!!) several times.
This was my finished item. I think next time i will make the hat in a lighter colour so i have more choice with the colours for the rose. The photos aren't the best as my daughters baby Annabell doll wasn't playing ball and kept trying to slide down in the chair!!
As always please Share links to the patterns and not the actual pattern, as creators we love seeing what you make for our designs but please give credit to the designers if selling finished items.
xXx
No comments:
Post a Comment